Friday, January 30, 2015

Messerschmitt Me 163 S--The End


As far as weathering is concerned I wanted to show an operational aircraft so a certain amount of wear and tear was in order.
 
 
The underside of the Rocket plane took a good amount of beating due to its particular take-off and landing method.
 
 
Wing roots were being trampled as on most fighters. The paint in all these areas was chipped using the masking liquid method.
 
 
Notice that the undercoat on the wings is red brown rather than metal as the Komet's wings were wooden and coated with a reddish primer.
 
 
An oil wash was applied to the panel lines, which turned out to be too dark. Oh, well...


That's as far as I went with the weathering as gliders are kept clean as a general rule and the Komet trainer would have been no exception.
 
This is the end if this buid report but not the end of the story. After spending many months on the build I lay the model aside once complete and turned to something else but I haven't build the Scheuchschlepper (towing tractor) yet and I do intend to make a little dio for the model in the future.
 
As a footnote, the model got a Gold at the 2913 IPMS Hellas!


Thursday, January 29, 2015

Messerschmitt Me 163 S--Painting & Markings

The spraying of the RLM and colors was done with Gunze paints. The two-tone RLM 75/82 scheme is based on my imagination in keeping with the whatif motive.

Doing the mottling wasn't particularly difficult, thanks to the high-quality paint and my trusted Iwata airbrush.
Markings were down with custom made masks from Miracle Masks. I highly recommend those for their quality and ease of use.
Even the outline swastika could be easily done with this method, in spite of their small size in 72 scale.


Decals were used for the stencils, mostly from the kit.
The emblem came from the Rocketeer sheet for the Komet and was donated by a fellow modeler.

Tuesday, January 27, 2015

Messerschmitt Me 163 S--Corrections

The Academy Komet is quite accurate but in need of correction in some respects. I have quite a few reference books about the Komet, including the two-tome work by Ransom and Cammann (Classic volumes 8 & 9), arguably the definitive Komet reference book. It contains many of the famous three-view drawings by acclaimed aircraft drawing artist Arthur Bentley.


By comparing the kit's panel lines to the drawings I found a certain amount of discrepancies, which I decided to remedy: some panel lines had to be removed completely (e.g. from the wings, which were wooden on the real thing and had no panels at all) and others were missing and had to be scribed.


Why would I go to such lengths on what is ultimately a 'whatif' model? Well, the idea was to make an exact representation of the Komet trainer as it could have been, had time and circumstances permitted it to go into service. Perhaps I also wanted to prove to myself that I was able to do the necessary corrections and make a model 'true to technical drawings'.


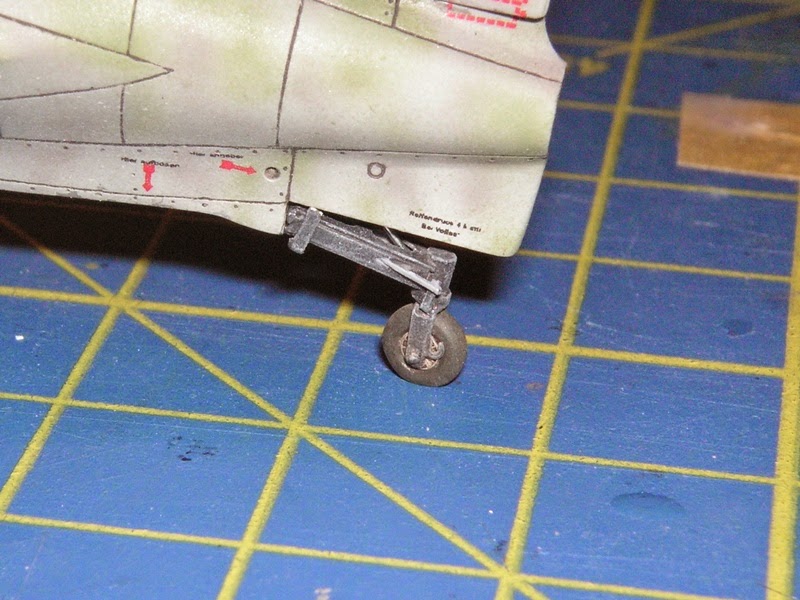
Pictures show the amount of re-scribing done. Some missing details, such as the towing cable attachment point and the small scoop under the nose, were also added at this point.


Talking of references, among the ones in my possession I found Aero Detail 10 most useful from a modeler's point of view as it has plenty of excellent color photos of surviving Komets from around the world, accompanied by helpful captions and some useful diagrams as well.


The already mentioned Classic volumes are a scholarly work that will be found invaluable by anyone interested in the history of the Komet. In addition to the Bentley drawings it also contains color profiles and many contemporary photographs.


A 'fun' read, and my personal favorite Komet book is Rocket Fighter by Mano Ziegler.

No list of Komet references would be complete without mentioning the excellent on-line resource by Rob de Bie.

Me 163 by Rob de Bie

It is by far the most exhaustive and complete source of information about the Komet to be found on the Internet and it is continually being updated with new information. It has everything a modeler can desire, including a wealth of information about any and all Komet-related kits and other modeling products as well as walkarounds and much, much more. I would like to take this opportunity to thank Rob for what he is doing for the modelers and Komet fans communities!

Tuesday, January 13, 2015

Messerschmitt Me 163 S--Landing Gear Part 1


The next area that was in need of detailing after finishing the cockpit was the landing gear.


Photoetch to the rescue, both the Eduard and PART frets were used for both the gear and the bay.


Some details that were not covered by either kit or detailing set, such as the landing skid and tail wheel actuators, were scratch built.


Some of the items that were included in the Eduard set had to be redone from scratch, for example the skid operation arms. The flat photoetch just didn't render well enough the 3-D aspect of the real thing which was made of tubular steel. The PE arms when not totally useless though, as they could be used as a pattern to make new ones with lengths of wire from a paperclip.


I used the kit's wheels for the dolly, although they are reportedly wrong, because I was unable to find replacements and so decided to enjoy the perks of whatif and depart slightly from reality on account of this being a Luft 45+ build.


Sunday, January 4, 2015

Messerschmitt Me 163 S Build--Cockpit

The Academy kit is a good kit without issues to speak of. I decided to use aftermarket to add detail and there's quite a bunch of it out there, owing to the iconic status of the Komet.
 
 
After hesitating between photoetch and resin for a while I finally opted for the former and I'm glad I did as there is no way to reach the same level of detail with resin as can be reached with PE, especially if augmented with a little scratch-building.
 
 
I used the photoetch offerings from Eduard and PART. Although overlapping in some areas the sets are rather different and complementary. For example PART allows one to detail the Scheuchschlepper (Komet tractor), which Eduard doesn't touch on at all, while the latter covers the cockpit in breathtaking detail.


The Eduard set contains two frets, one of which is pre-painted, for a total of close to one hundred parts so it is not for the faint-hearted. But with some patience and TLC one can use it to really bring the cockpit (and other parts of the model) to life.


What's more, Eduard includes all the parts necessary to build the trainer with a complete backseat cockpit, which was what made me opt for that version: it would have been a pity to have half of that beautiful pre-painted PE go to waste! I anyway intended to indulge my whatif penchant and going for an operational trainer--which never saw the light of day--suited me just fine!


A substantial amount of build time went into the cockpit(s)--the proverbial kit within a kit--but I think it was time well invested. It required blending the pre-painted photoetch with the other PE and the scratch-built parts while staying as close as possible to the reference photos but the experience was a pleasant one and gratifying in terms of results.